
Understanding ConnectWise Opportunity Cards
What each part of a card shows on a ConnectWise opportunity board.
The parts of an opportunity card are: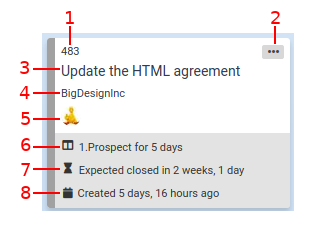
- Opportunity ID. You can easily copy the opportunity ID to your clipboard by hovering over the number with your cursor, then clicking the
 icon that appears.
 - Card menu, with these functions:
- Send to Top: ranks the opportunity at the highest priority in the column
- Send to Bottom: ranks the opportunity at the lowest priority in the column
- Edit Opportunity: view and change various properties of the opportunity
- Open in ConnectWise: open the opportunity in the ConnectWise web app. You can also click the opportunity title to do this.
- Opportunity summary. Click the summary to open the opportunity in a new tab in the ConnectWise web application. Hold the Shift key and click the summary to open the opportunity in the existing tab.
- Company name
- Sales rep and inside rep
- Length of time since the opportunity has changed stages in TopLeft. This is only shown if the column's "Status Age" option is enabled.
- Expected close date. This is shown if the board's "Show expected close date" option is enabled.
- Age of opportunity. This is shown if the board's "Show opportunity age" option is enabled.
Updated September 23, 2026
Comments
No comments yet.